
Conditional Email Notifications through Netlify Forms and Hooks
Sending conditional email notifications based on the value of a user-submitted form field is still very much a thing, and it can be achieved via fun workaround when using Netlify forms.
Well, it's 2019 as I write this, and yet it seems like contact forms aren't going away any time soon. I always figured we'd have a better solution for capturing user feedback by now. But it makes sense that they're still around. Forms are a tried-and-true method for accepting dynamic data from a user while keeping that user on the site.
So even as we move on to adopting game-changing new approaches to building websites — i.e. following the Jamstack and deploying via Netlify — we still need to consider accepting data from our users using form submissions.
Fortunately, Netlify offers form handling on their free tier, which is kind of amazing.
Unfortunately, Netlify doesn't (yet) offer conditional hooks or notifications. And conditional notifications — sending an email to some address based on the value of a form field — is a request I continue to receive, mostly from corporate clients.
While Netlify doesn't provide a couple-click solution to creating conditional email notifications, we can be clever and create a fun workaround for accomplishing this without too much code.
Let's take a look.
[0] Pre-Tut Notes
First thing is first — let's lay out the scenario.
You've been asked to add a contact form to your website. It's going to collect four fields: subject, name, email, and message. All fields are required.
To keep it simple, will account for an either-or type of condition for the subject. If the value of subject is Sales, we want to send the email notification to sales@helloworld.com. If the value is Marketing, we'll send the email to marketing@helloworld.com.
We'll keep this SSG-agnostic, which means I'm not going to talk about which SSG (static site generator) you might be using. However, I will be considering that we're in a static context — i.e. that all pages on your site are HTML pages that are generated during the build. Some SSGs, like Gatsby, act like a static website, but are actually running a single page application (SPA/). Working with Netlify forms in contexts like Gatsby make things a little trickier. I'm not going to touch on those nuances here.
If you are using a JS-based SSG, I think you can still get some useful information out of this article. You may also gain some insights by reading my intro guide to Netlify forms. It outlines what I find to be the essential information you need to know before working with Netlify forms, especially if you're working with JS-rendered forms.
(Really, I think you'd get good information from the guide regardless of the context in which you're working.)
Okay, let's write some code.
[1] Setup Form
The first step is to setup your Netlify form with the fields you want to capture. At its core, following Netlify's docs, our form should look something like this:
<form name="Contact" method="POST" data-netlify="true">
  <select name="subject" required>
    <option value="Marketing">Marketing</option>
    <option value="Sales">Sales</option>
  </select>
  <input type="email" name="email" required />
  <input type="text" name="name" required />
  <textarea name="message" required></textarea>
  <button type="submit">Send</button>
</form>
You may eventually want to add some other features to your form — e.g. a honeypot or reCAPTCHA field — but let's stay focused on the conditional notifications.
Once you have that form built, I'd suggest deploying it to Netlify and testing to make sure it's in working order. (You can use Deploy Previews if your site is already in production.) As long as you have deployed that code above, the form will just work.
Once your code is deployed you can test your form and make sure you are receiving entries. Entries will come into the Netlify UI (the URL looks like https://app.netlify.com/sites/[your-site]/forms where [your-site] is the name of your site). (Note: There is a spam filter in place so if you submit test/dummy data, it likely won't make it through.)
A Note on Netlify's Form Processing
Netlify looks for the data-netlify attribute during post-build processing and creates a form for each form[data-netlify] element with a unique name attribute that it finds.
Did you notice when your form appeared in the Netlify panel that it was named the same as the value you had in the name attribute? If you followed the code above exactly, Netlify called the form "Contact."
Suppose you changed the form to look like this:
<form name="My Form" method="POST" data-netlify="true">
  <!-- ... -->
</form>
Then the form would appear in Netlify as "My Form" because that's the value of the name attribute.
[2] Create Form for Each Option
The form you just built may work great on its own, but it doesn't provide a means to achieve conditional email notifications. The way we're going to achieve conditional notifications is by having a separate Netlify form for each option in the subject <select> field. And we'll use a little bit of JavaScript magic so the user doesn't notice any difference on the front-end.
That means, the next step is to add a form for each potential subject, naming them uniquely and appropriately:
<form name="Contact-Marketing" method="POST" data-netlify="true">
  <select name="subject" required>
    <option value="Marketing">Marketing</option>
    <option value="Sales">Sales</option>
  </select>
  <input type="email" name="email" required />
  <input type="text" name="name" required />
  <textarea name="message" required></textarea>
  <button type="submit">Send</button>
</form>

<form name="Contact-Sales" method="POST" data-netlify="true">
  <select name="subject"></select>
  <input type="email" name="email" />
  <input type="text" name="name" />
  <textarea name="message"></textarea>
</form>
Notice that we now have two forms — Contact-Marketing and Contact-Sales. If you deploy your site again, you should see these both appear in Netlify's UI.

Also notice that while we put fields in the Contact-Sales form, they are a bit stripped down. There is no submit button, and we don't have any options for the subject select. This is by design, because we're not actually going to use these fields, but Netlify needs to see them when processing to accept them as a valid submission.
[3] Adjust Form Visibility
Consider in a real-world application that there are going to be more than two options for choosing a subject on the form. That means potentially duplicating forms several times. Therefore, we ought to hide any forms that are only there to be registered and not to be interacted with.
Let's add a .hidden class to the sales form, since we don't need to see it:
<form name="Contact-Sales" method="POST" data-netlify="true" class="hidden">
  <!-- ... -->
</form>
And then hide it with CSS:
form.hidden {
  display: none;
}
Now you should not see that form appear on the front-end, and that's okay.
Pro Tip: Forms are registered regardless of what page they appear on. Instead of hiding forms you don't want to see on the current page, you could stuff them on an obscure page your visitors don't know about.
[4] Make the Visible Form Conditional
The next step is to dynamically change the name of the visible form based on the value of the subject.
Before we do that, there's one important nuance with Netlify forms that I've yet to mention — the form-name field.
Netlify adds a hidden form-name field to every form in your site (if your site is truly static). This is how Netlify knows which form to apply the submission to when the form is submitted by a user.
That's the field we really need to change when the subject field changes. But we'll change the form's name attribute, too, just for fun!
Note: This solution does not use best practices. I'm going to use a global JavaScript function only to display the simplicity of this solution. I recommend you consider making your JS code local and using event listeners, rather than a global functional and an inline attribute, which is what we're about to do.
Here's the JS code, with comments for reference:
function changeFormName(event) {
  // The value of the subject field.
  var value = event.target.value;
  // The name we want to apply to the form, based on the value.
  var name = "Contact-" + value;
  // The form element in the DOM.
  var form = document.querySelector("#conditional-form");
  // Apply the new name to the form's [name] attribute.
  if (form) form.setAttribute("name", name);
  // The [name="form-name] field in the DOM.
  var formName = document.querySelector('#conditional-form [name="form-name"]');
  // Apply the new name to the [name="form-name"] field within the form.
  if (formName) formName.setAttribute("value", name);
}
Note that this code assumes we have an id value of conditional-form on the form we want to target. And also note that we have to attach this function to an attribute on the <select> element.
Therefore, the <form> element should now look like this:
<form
  name="Contact-Marketing"
  method="POST"
  data-netlify="true"
  id="conditional-form"
></form>
And the <select> field should look like this:
<select name="subject" required onchange="changeFormName(event)">
  <!-- ... -->
</select>
Demo here: https://codepen.io/seancdavis/pen/pmNdXK
Note: I can't emphasize enough that I don't want you to implement this exactly as I have here, but to use this approach in a way that makes sense for your site.
If you deploy the code now, you should be able to toggle the value of subject and see submissions appear in their respective forms in the Netlify UI.
[5] Configure Notifications
The last piece is to go into Netlify's UI and choose to send an email notification for each of these forms.
Navigate to your site in the Netlify UI. Then find Settings > Forms > Form notifications. Add an "Email notification":
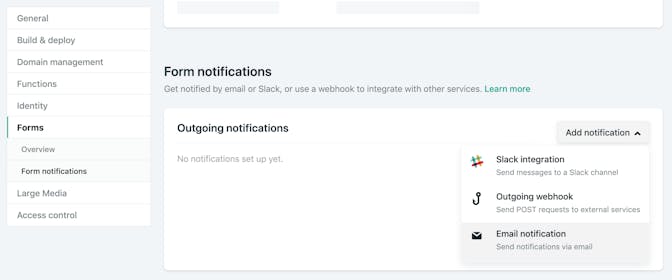
And choose for it to listen for a "New form submission" while adding the appropriate email address. And don't forget to choose the correct form.

Repeat this process for every form representing an option in your subject field.
Now go test it out and you should see conditional form notifications coming into your respective email inboxes!
Pro Tip: If you have a Gmail email address, you can append +... to your username and your user will still receive the email addresses. For example, if my email address is bobloblaw@lawblog.net, then I would also receive emails sent to bobloblaw+marketing@lawblog.net and bobloblaw+sales@lawblog.net. This can be a useful method for testing multiple email addresses without needing multiple accounts.
It feels like there's a lot to this, but once you get the hang of it, you'll see why it's my preferred method for conditional email notifications. It takes the burden of sending the email off you — the developer — and leaves it with Netlify. All you have to do is make sure you're submitting the data to the correct Netlify form.
And a huge benefit here is that this enables you or your clients to adjust the emails that receive notifications without needing to rebuild or redeploy your entire site.
I hope you found this useful and are now receiving thousands of new emails every day!
Keep Reading


What You Need to Know When Using Netlify Forms
Netlify forms are an incredibly powerful feature. They enable you to accept dynamically-driven user data on your static site. But you must understand a few key concepts about Netlify forms if you're going to have success working with them.

WTF is Jamstack?
This term "Jamstack" is becoming a buzzword among development communities. But what does it mean and why should you care about it?